Blocky Programming
Graphical programming is the core feature of Dobot+. By configuring to generate corresponding blocks, you can reduce the difficulty of script writing. Locate
src/config/Blocks.jsonand customize the blocks you want by specifying parameters.
This chapter will introduce how to configure dynamically generated blocks, and you will learn about:
- How to customize the appearance of blocks
- How to configure block-to-code conversions
- How to support multithreading
- How to customize the menu bar icons
- How to add pop-up pages for blocks
- How to perform internationalization
- How to debug blocks online
Customizing Blocks
We support executing blocks, returning value blocks, judging blocks, and ending blocks.
JSON Configuration
{
    "block_name": "SetModbusIODigitOutput",
    "block_color": "#4D7DDD",
    "block_type": "shape_statement"
}
Description of Fields
| Field | Type | Default Value | Required | Description |
|---|---|---|---|---|
block_name | string | None | Yes | The name of the block function; only pure letters are supported. |
block_color | hexadecimal color string | None | Yes | The color of the block. |
block_type | BLOCK_TYPE | None | Yes | The shape of the block, indicating the logic used. |
BLOCK_TYPE
| Type | Description | Style |
|---|---|---|
shape_statement | Code block with no output |  |
output_number | Code block outputting numbers | |
output_string | Code block outputting strings | |
output_boolean | Code block outputting booleans | |
shape_end | Code block indicating the end of flow |  |
shape_hat | Code block indicating the start of flow |  |
Note:
- When configuring
block_name, different blocks cannot repeat; repetition will lead to data overwriting. - It is recommended to use a uniform color for the same plugin.
- Supports custom parameter types for blocks.
Custom Parameter Types JSON Configuration
[
    {
      "message": "设置扩展IO数字输出 %1 %2",
      "params": [
        {
          "param_type": "field_dropdown",
          "data_type": "",
          "name": "name",
          "default": "",
          "options": [
            {
              "label": "Modbus_IO1",
              "value": "default"
            }
          ],
          "update": {
            "type": "lua",
            "function": "GetModbusArr",
            "args": {
              "type": "custom",
              "value": "do"
            }
          }
        },
        {
          "param_type": "field_dropdown",
          "data_type": "",
          "name": "do",
          "default": "",
          "options": [
            {
              "label": "DO_101",
              "value": "default"
            }
          ],
          "update": {
            "type": "lua",
            "function": "GetModbusDOArr",
            "args": {
              "type": "field",
              "value": "name"
            }
          }
        }
      ]
    }
]
Description of Fields for Custom Parameters
| Field | Type | Default Value | Required | Description |
|---|---|---|---|---|
message | string | None | Yes | The block uses %n for interpolation. |
params | ParamsType[] | None | Yes | Definition of block parameters. |
ParamsType
| Field | Type | Default Value | Required | Description |
|---|---|---|---|---|
param_type | InputType | None | Yes | The type of the parameter. |
data_type | math_number | text | None | No | The data type. |
name | string | None | No | Name for the input field. |
default | string | None | No | Default value for the parameter. |
options | {label:string,value:string}[] | None | No | Required when the parameter type is 'field_dropdown'; label is for display, value is the actual value for code conversion. |
update | updateType | None | No | HTTP interface call triggered when the block needs to be updated. |
InputType
| Type | Description |
|---|---|
input_value | Input box |
field_dropdown | Dropdown box |
input_statement | Nested statement |
Block-to-Code Conversion
JSON Configuration for Code Conversion
{
    "block_code": ["DO({do},{status})"]
}
Description of Fields
| Field | Type | Default Value | Required | Description |
|---|---|---|---|---|
block_code | string[] | None | Yes | Code generated from the block. |
Note:
shape_statementandshape_endtype blocks must have a newline character/nadded at the end of their code conversion.- For multithreaded blocks, parameters for code conversion should be in array format, sequentially converted into main thread code (src0.lua), child thread code (src1.lua), (src2.lua), etc.
- Refer to Advanced Block Configuration to learn about complex block configuration methods, such as for welding scenarios.
Custom Menu Bar Icons
If you need to display custom icons for the menu bar block group, place the icon resources in Resources/images. Specify the icon's name in Blocks.json, and the icon information will be synchronized with the graphical interface after the plugin is installed.
JSON Configuration
{
    "block_menuIcon": "grip.png"
}
Description of Fields
| Field | Type | Default Value | Required | Description |
|---|---|---|---|---|
block_menuIcon | string | None | No | The menu bar icon path; defaults to the standard icon if not configured. |
Block Pop-up Pages
Dobot+ blocks support pop-up pages for secondary processing in complex parameter scenarios. Clicking on a block displays a pop-up.
JSON Configuration
{
    "block_page": "template.html"
}
Description of Fields
| Field | Type | Default Value | Required | Description |
|---|---|---|---|---|
block_page | string | None | No | Indicates whether the block has a configuration page; provide the static page path to display a clickable icon. |
Internationalization
You can configure translations for blocks in the Resources/i18n/client folder.
-
In
Resources/i18n/client/zh.json, add to theblocksfield:{
"blocks": {
"tr_dobot_set_extio": "设置扩展IO数字输出 %1 %2"
}
} -
In
Resources/i18n/client/en.json, add to theblocksfield:{
"blocks": {
"tr_dobot_set_extio": "Set extended IO digital output %1 %2"
}
} -
Use the translation in the block:
{
  "block_configs": [
    {
      "message": "%{tr_dobot_set_extio}"
    }
  ]
}
Note:
- The
messageconfiguration uses%nfor interpolation placeholders, and the quantity must match the items in theparamsconfiguration; otherwise, the block will fail to load. - Use
%1for the first item in theparamsconfiguration,%2for the second, and so on.
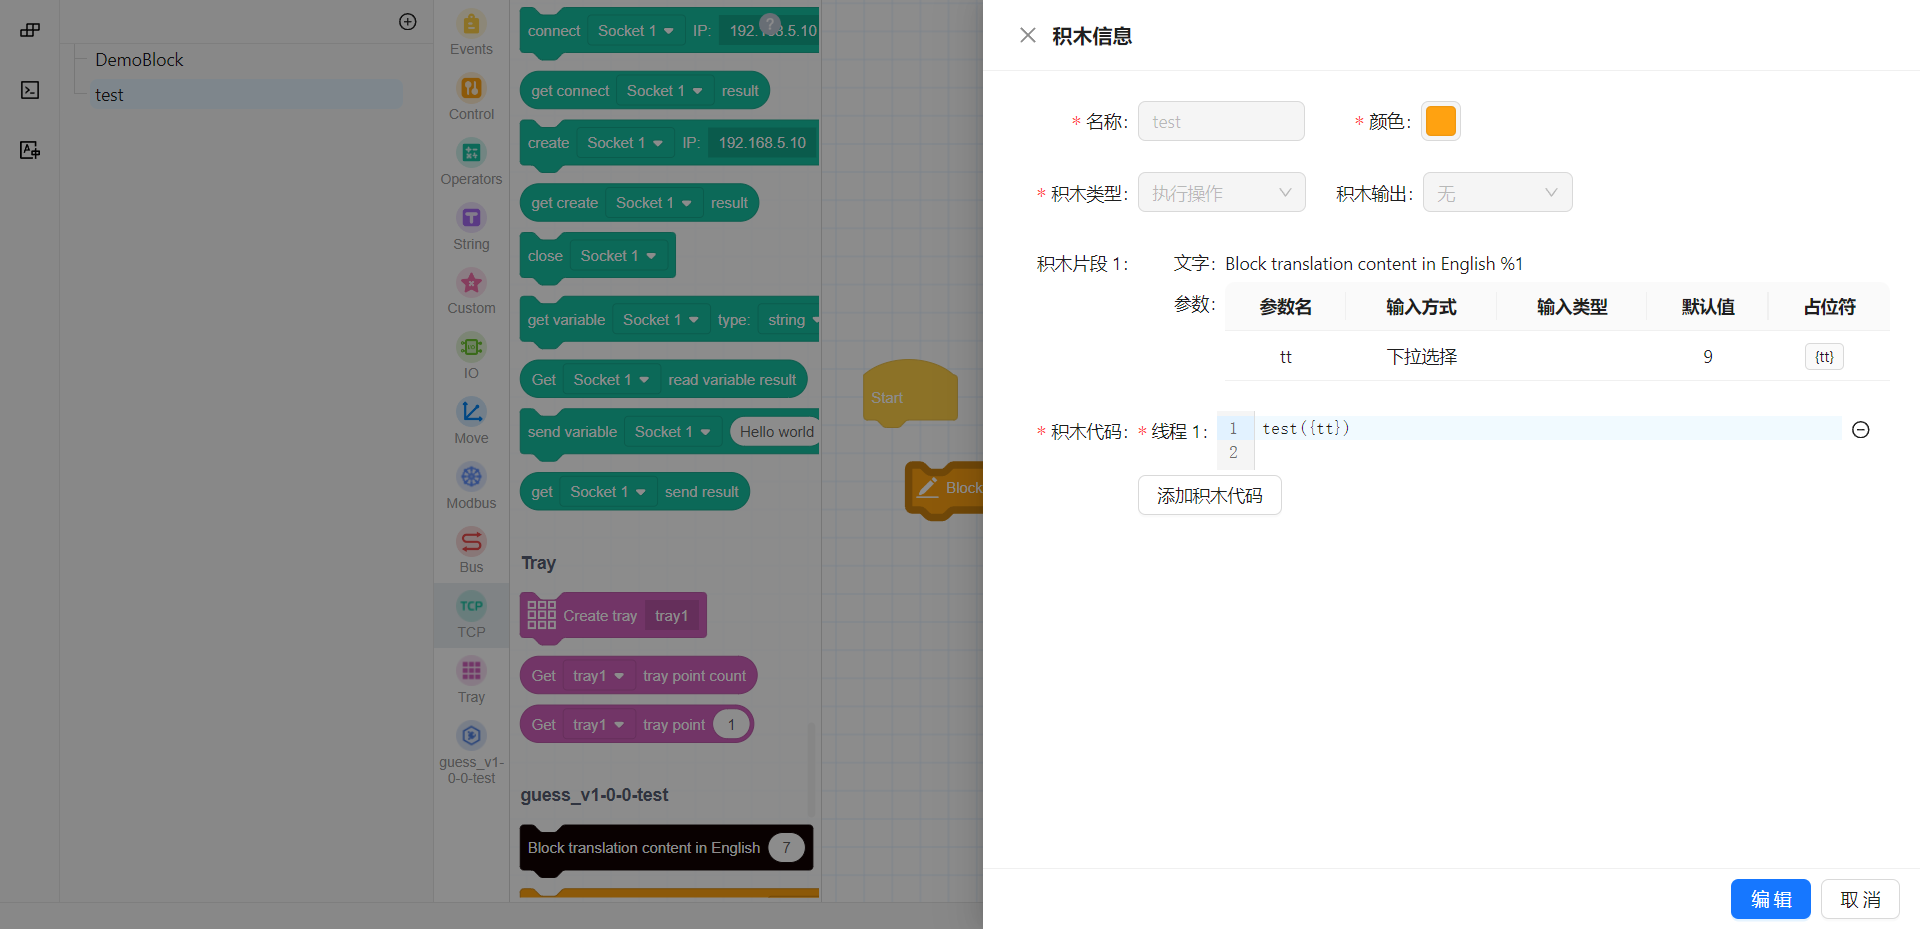
Online Debugging of Blocks
We support online debugging of block configuration parameters, allowing real-time previews of block effects. Execute the following command, and open the corresponding URL in a browser, then click on the block module.
dpt gui
-
Click on the block name in the left menu to view block configuration details.
-
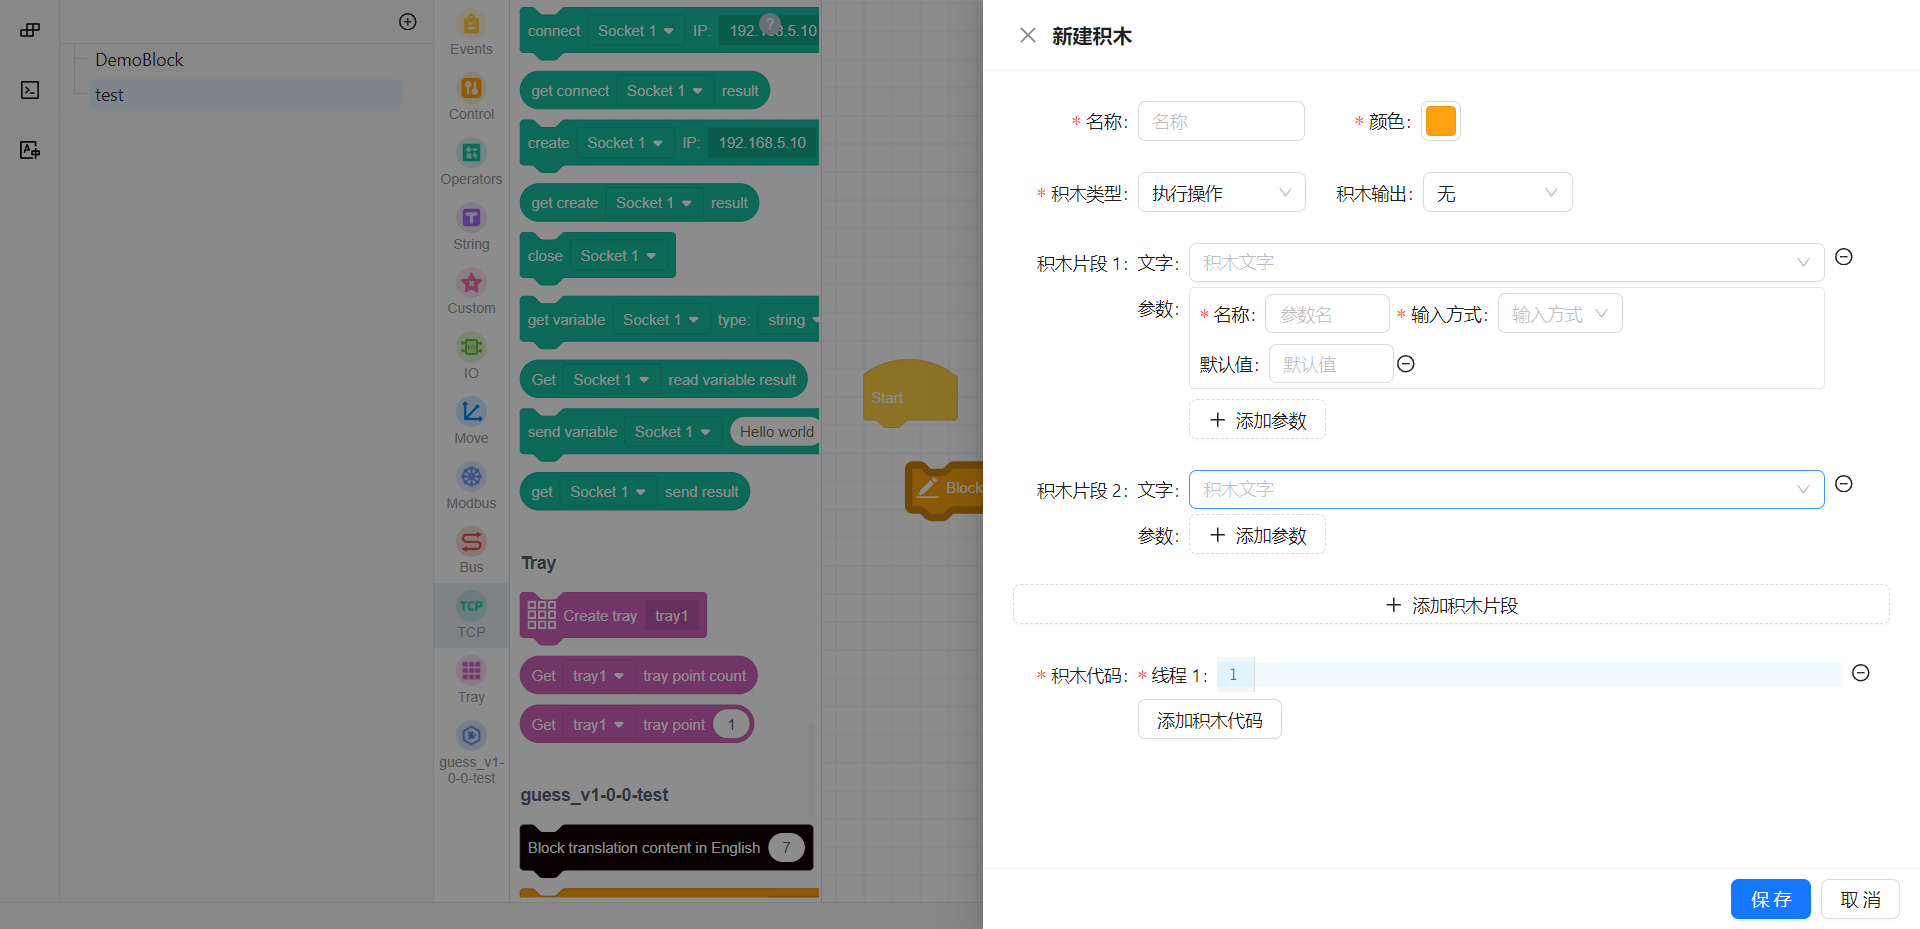
Click the + button to create a new block.
-
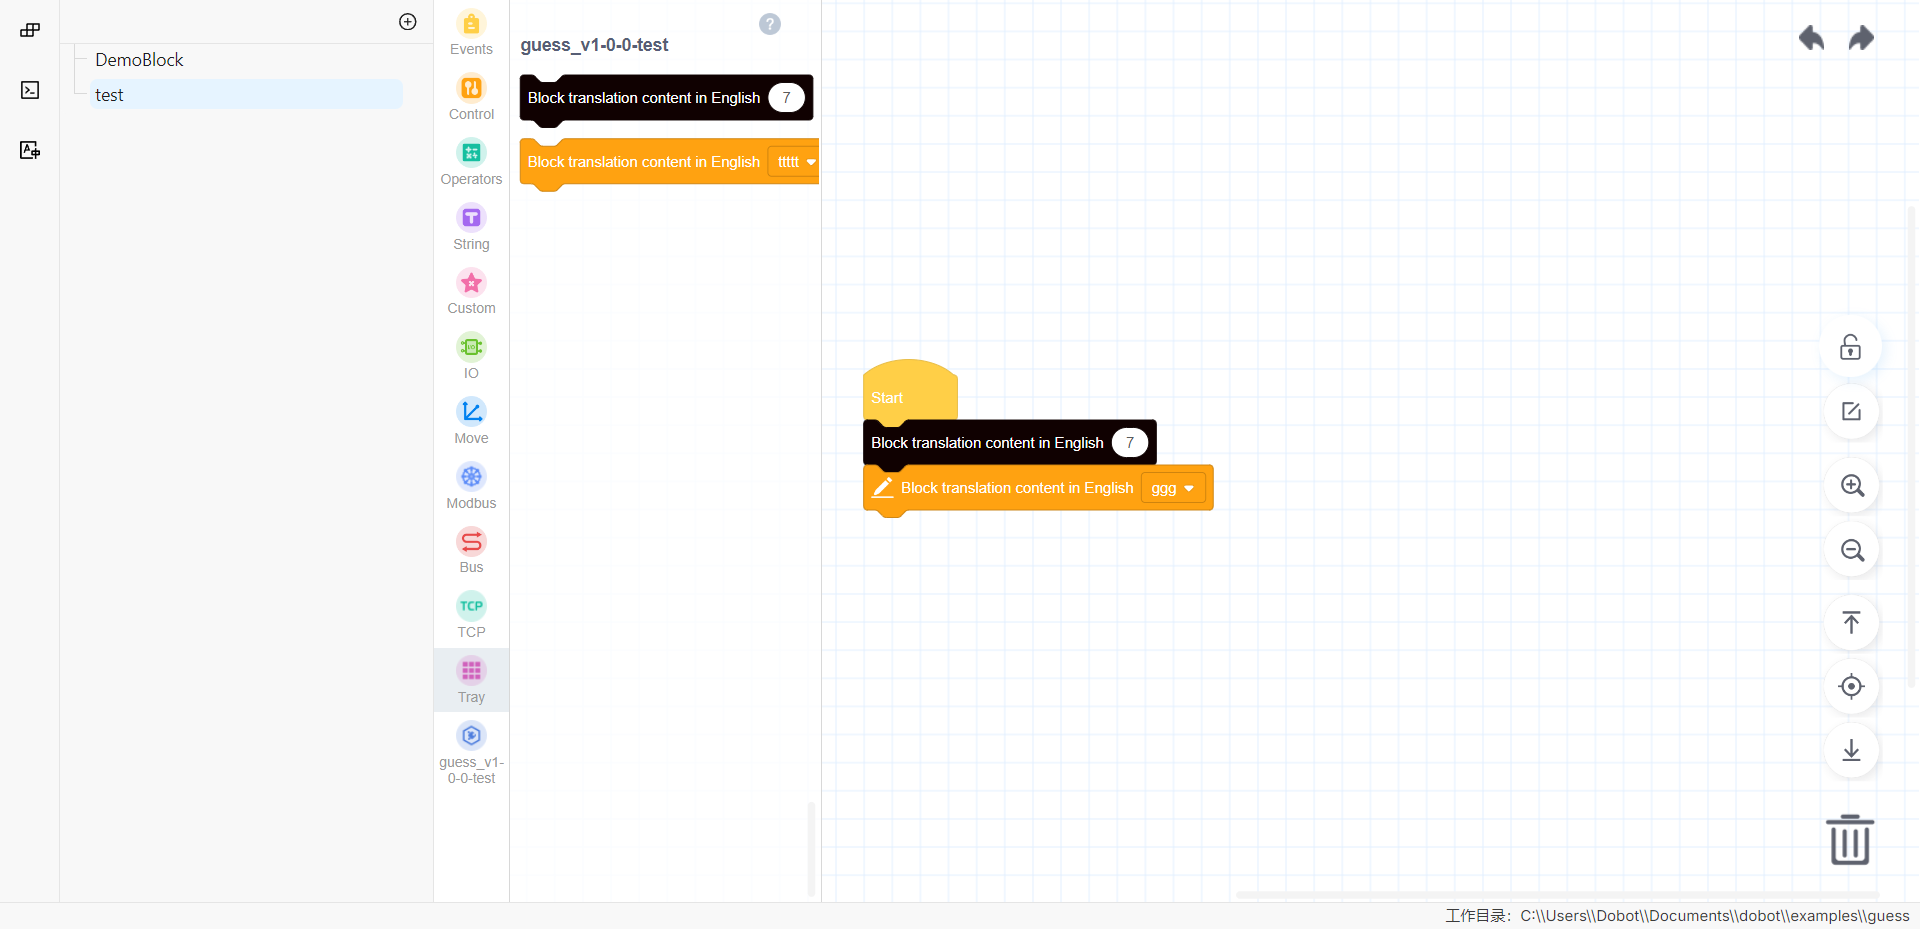
After the plugin is successfully created, you can preview the block effect on the page.
-
Hover over the left block menu to see a delete button. Click the red delete button to remove any unnecessary blocks.