Agent Skill: OnRobot Grippers
This example shows how to use the
dobot-plusskill in an AI Agent to adapt the OnRobot VG10 device. Instead of writing Lua, HTTP APIs, and UI pages by hand, the Skill generates plugin scaffolding from your device protocol document—you only need to preparedoc.mdand invoke/dobot-plusin the IDE.
Workflow
Environment Setup
Confirm the following before development. See Development Environment for more detail.
| Dependency | Version / Notes |
|---|---|
| Node.js | v20 or later |
| IDE | Supports Agent Skills (e.g. Cursor) |
| @dobot-plus/cli | Global install; provides dpt |
| @dobot-plus/skill | Global install; provides /dobot-plus |
Install:
npm install -g @dobot-plus/cli @dobot-plus/skill@latest
Verify:
node -v    # Should print v20.x or later
dpt -v     # Confirm CLI works
After install, the Skill is deployed to ~/.agents/skills/dobot-plus. Enable Agent Skills in your IDE settings. See Agent Skill for details.
Preparation
1. Create a plugin project
Initialize an empty Dobot+ plugin with @dobot-plus/cli:
dpt create
Example prompts:
$ dpt create
? Please input plugin name: OnrobotVG10
? Please input plugin description: OnRobot VG10 vacuum gripper plugin
? Please input plugin version: 1-0-0-test
? Please input device IP: 192.168.5.1
Then:
cd OnrobotVG10
2. Write device document doc.md
The Skill does not create or modify doc.md. You must write a complete protocol document in the project root. It should include at least:
- Communication parameters (Modbus RTU baud rate, parity, slave address, etc.)
- Register addresses and bit-field descriptions
- Device function list (grip, release, read vacuum, etc.)
VG10 uses Modbus RTU over RS485. When connected via Quick Changer, the device address is 65 (0x41). Core registers:
| Address | Register Name | Description |
|---|---|---|
| 0 (0x0000) | Channel A Control | Channel A (Release / Grip / Idle) |
| 1 (0x0001) | Channel B Control | Channel B control |
| 2 (0x0002) | Current Limit | Current limit (mA; default 500, max 1000) |
| 258 (0x0102) | Channel A Actual Vacuum | Channel A actual vacuum (read-only) |
| 259 (0x0103) | Channel B Actual Vacuum | Channel B actual vacuum (read-only) |
Split functions into atomic operations in doc.md, e.g. GripChannelA, ReleaseChannelA, GetVacuumA—not a single ControlGripper. See the VG10 example in the Agent Skill doc, or derive from the OnRobot Modbus PDF linked at the end.
Generate with AI
You can ask a general-purpose AI to turn a vendor PDF into doc.md, then review and save it in the project root. The Skill only reads doc.md; it will not create or edit it.
Required content:
| Category | Description |
|---|---|
| Protocol | Type, baud rate, data bits, parity, stop bits |
| Slave address | Modbus RTU slaveID (list per connection method) |
| Register map | Decimal + hex address, name, read/write access |
| Bit fields | High/low bytes, bit meaning, enum values, write examples |
| Functions | Each externally exposed atomic operation |
Suggested outline:
- Device overview
- Communication protocol (Modbus RTU + device address)
- Register overview
- Register details (bit fields, enums, units, ranges)
- Operation flow
- Version info and safety notes
Structure reference: VG10 full example.
Copy this prompt into ChatGPT, Cursor, etc., and attach the OnRobot Modbus PDF text or screenshots:
You are an industrial device protocol documentation assistant. From the manual content I provide, produce a doc.md device document that meets Dobot+ Skill requirements.

## Output requirements
1. Output Markdown only from my materials; do not invent register addresses, bit fields, or parameters
2. Mark uncertain items as "TBD"; do not guess
3. Use English; keep register and mode names as in the manual

## Must include
1. Device overview
2. Communication: Modbus RTU (baud, data bits, parity, stop bits) and slaveID
3. Register overview: decimal + hex, name, read/write
4. Per-register detail: bit/byte layout, enum vs register value, units and ranges
5. Typical operation flow
6. Version info and safety notes

## Function splitting rules
- One action per function; camelCase Verb+Noun: SetSpeed, GetVacuum, GripChannelA
- Do not merge: SetSpeedAndAcceleration, ControlGripper
- Read-only status: provide English camelCase keyWord (e.g. actualVacuum)

## Bit fields and write examples
If a register has multiple fields, document bits/bytes and combined writes (e.g. 0x0114 = high byte 0x01 mode + low byte 0x14 parameter).

---
Source material:
[Paste PDF text / OCR / manual sections]
After generation, verify:
slaveIDmatches your connection (VG10 via Quick Changer: 65)- Register addresses and access match the vendor manual
- Bit fields allow deriving Modbus writes (Grip mode + vacuum %)
- Functions are atomic
Save as doc.md in the project root, then run /dobot-plus.
3. Hardware connection
- Connect VG10 via Quick Changer or RS485 to the robot flange
- Controller RS485: 1000000 bit/s, Even parity, 8 data bits, 1 stop bit
- Match
dpt.jsoncontroller IP to the real device
{
  "ip": "192.168.5.1",
  "pluginPort": 22100
}
Using the Agent Skill
1. Invoke in the IDE
In project chat:
/dobot-plus
The agent will automatically:
- Read and parse
doc.md - Split into atomic functions and write
function.json - Validate
function.json - Generate
httpAPI.lua,userAPI.lua,modbus.lua, block/script configs - Generate
ui/Main.tsx - Fill function stubs in
lua/[project-name].lua
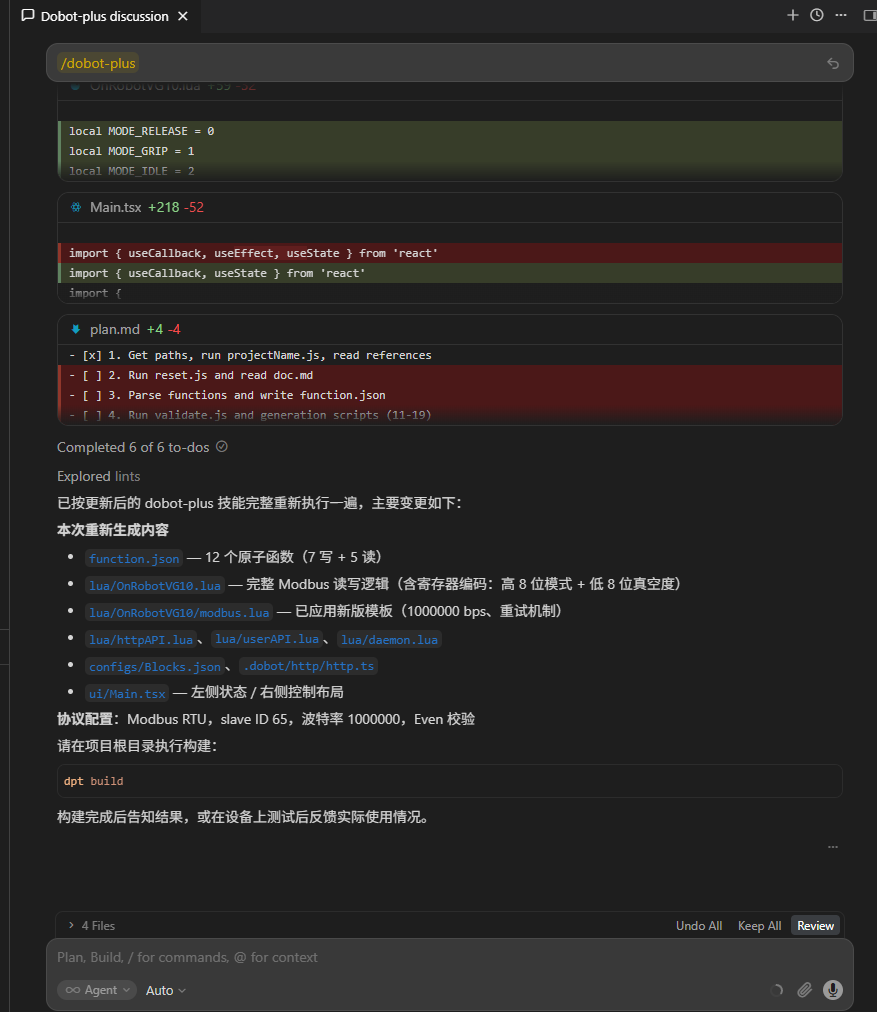
2. Review output
| Path | Description |
|---|---|
function.json | Functions and protocol parameters |
lua/*.lua | Modbus and business logic |
lua/httpAPI.lua | HTTP API for UI |
lua/userAPI.lua | Block/script API |
configs/Blocks.json | Block programming |
configs/Scripts.json | Script programming |
ui/Main.tsx | Control UI |
.dobot/http/http.ts | Frontend HTTP client |
Check function.json slave address and register map against doc.md, and Modbus logic in lua/[project-name].lua.
3. Local debug (optional)
Skip this if you will validate only after importing into DobotStudio Pro.
dpt dev
$ dpt dev
? Debug lua on real device? Yes
? Please check the device IP: 192.168.5.1 (y/n)
- No: UI-only preview in the browser
- Yes: Real device; UI calls
httpAPI.lua→ Modbus → VG10
Adjust UI copy, Resources/i18n/, and block/script configs as needed.
Build
dpt build
Outputs:
dist/— built sources for inspectionoutput/—<plugin-name>-<version>.zipfor import
Import and use
- Open DobotStudio Pro → Dobot+ plugin manager
- Uninstall any same-name plugin first
- Import the zip from
output/ - Use the plugin from the nav bar (UI, blocks, scripts)
Package name pattern:
<plugin-name>_v<major>-<minor>-<patch>-<status>.zip
See Quick Start — Build & Use.
FAQ
Skill reports missing doc.md
Ensure doc.md is in the project root with full protocol, registers, and functions. The Skill will not create it.
Wrong slave address in output
Confirm doc.md states the Modbus slave address (VG10 via Quick Changer: 65). The Skill extracts slaveID into function.json.
Modbus communication fails
- Match RS485 settings to the VG10 protocol
- Check Quick Changer / RS485 wiring
- Verify IP in
dpt.jsonwhen usingdpt dev
Poor Agent results
- Confirm on-site communication parameters match the manual
- Review
doc.mdfor ambiguous or contradictory descriptions - Check the Agent model: in VS Code Copilot use GPT-5.4 or newer; in Cursor, Auto mode generally works well